Ask the Builder: Troubleshooting a masonry fireplace

Every winter, I get quite a few emails from readers who suffer from smoky fireplaces.
Just a month ago, one of my amateur radio friends reached out to me with the same problem. After asking him some questions and looking at photos he provided, I was able to solve his primary problems. I saw reasons why he was plagued with smoke in his home, and you might be in the same boat.
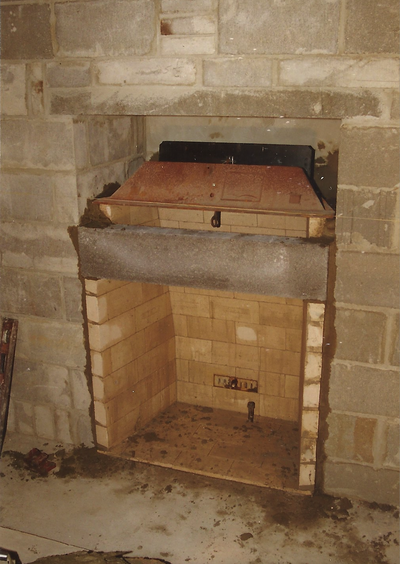
The two main causes of smoke in his home were the lack of a combustion air intake and his chimney was not the correct height. A few of his photos also showed a very dangerous situation in which his flue liners were not surrounded by solid masonry, rubble, and mortar. A hot ember could make contact with wood framing with little difficulty.
Over the years, I’ve visited homes that have fireplaces built by amateurs or paid masons that have no clue how to build them. You may not think it’s that hard to build a fireplace, but it’s actually very technical. The width of the fireplace opening controls all the other dimensions.
The Brick Industry Association (BIA) should be your go-to source for all the information you need if a traditional masonry fireplace is in your future. I’ve used the association’s specifications for more than 40 years to build smoke-free fireplaces in all of the homes I’ve ever built.
I urge you to go to their website and download the free technical notes publications about masonry fireplaces. They are as follows:
#19 Residential Fireplace Design
#19A Residential Fireplaces, Details and Construction
#19B Residential Chimneys – Design and Construction
These publications are written so a lay person can understand them with ease. The illustrations and tables allow you to easily visualize exactly how a masonry fireplace should be constructed. If you have a smoking fireplace, you’ll no doubt discover the cause of why you’re coughing by using the three publications. I guarantee they’ll help you do an autopsy on your fireplace.
When you dive into the documents, you’ll discover that the shape of the firebox is critical. The sides have to be angled and tapered to the rear of the firebox. The rear wall needs to be vertical rising up from the floor, but then at a certain height it needs to start to gently slope toward the front of the fireplace.
The position of the damper is extremely important. Not only does it need to be at least 8 inches above the opening of your fireplace, but it also needs to be forward and close to the room. By default, this creates the smoke shelf behind it. It’s far more complex than you probably ever realized.
One of the biggest mistakes I routinely see when homeowners send me photos is the use of regular mortar to set the actual high-temperature firebrick. That’s a huge mistake. The firebrick is supposed to be set using fire clay. Regular mortar will crumble in short order. If you see sand in the mortar joints in between your firebrick and the joints are about 3/8-inch tall, you’ve got the wrong mortar.
Fire clay is a powdered clay that’s mixed with water. It’s rich in both aluminum and silica and can withstand decades of high temperatures inside the firebox. The fire clay joints are very thin, normally less than 1/8 inch in height. A mason who knows what she/he is doing carefully dips the side of the brick that will touch another one into the soupy batter.
Your mason may build the firebox correctly and yet your fireplace still smokes. If that’s the case, you then need to see what went wrong with the chimney. The size of the flue is directly related to the size of the firebox. All of these specifications can be found in the BIA Technical Notes.
Don’t overlook the height of the chimney. It’s very important because of downdrafts created by nearby trees or parts of your roof. All of this is covered in the documents.
Last but not least, be sure that the mason builds the chimney crown properly. Based on my lifetime experience, I’d say that less than 1% of all chimney crowns are constructed properly. To see how to do it, pay close attention to the diagrams in the #19B document. Don’t forget the all-important drip kerf under the crown overhang!
Subscribe to Carter’s free newsletter at AsktheBuilder.com. Carter offers phone coaching calls if you get stuck during a DIY job. Go here: go.askthebuilder.com/coaching