Ask the Builder: Finding the right pipe for your project

Q. I went to buy plastic drain pipe, and, after looking at all the types, my head started to hurt. I decided to leave the store and do some research. I’ve got several projects for which I need a plastic pipe. I need to add a bathroom in a room addition; I need to replace old, cracked clay downspout drain lines; and I want to install one of the linear French drains I saw on your website to dry out my basement. Can you give me a quick tutorial on the sizes and types of plastic pipe the average homeowner might use around her/his home? – Lori M., Richmond, Virginia
A. It’s fairly easy to get flummoxed, as there are so many plastic pipes. Not long ago, I installed a somewhat special plastic pipe to vent my daughter’s new high-efficiency boiler. It is made from polypropylene and can withstand much higher temperatures than standard PVC that most plumbers might use.
It’s very important to realize that there are lots of plastic pipes that you might use, and the chemistry of them is quite complex. I’m just going to stick with the most basic ones you might run into or might be required to use by your local inspectors.
PVC and ABS plastic pipes are perhaps the most common ones you’ll run into when it comes to drainage pipes. Water supply lines are another ball of wax, and I’m not even going to try to confuse you further about those!
I used PVC for decades, and it’s fantastic material. As you might expect, it comes in different sizes. The most common sizes you’d use around your home would be 1.5-, 2-, 3- and 4-inch. The 1.5-inch size is used to capture water that might flow out of a kitchen sink, bathroom vanity or tub. The 2-inch pipe is commonly used to drain a shower stall or washing machine, and it may be used as a vertical stack for a kitchen sink.
A 3-inch pipe is what’s used in homes to pipe toilets. The 4-inch pipe is used as the building drain under floors or in crawlspaces to transport wastewater from a home out to the septic tank or sewer. The 4-inch pipe also may be used in a home if it’s capturing two or more bathrooms. Plumbers and inspectors use pipe-sizing tables to tell them what size pipe needs to be used where.
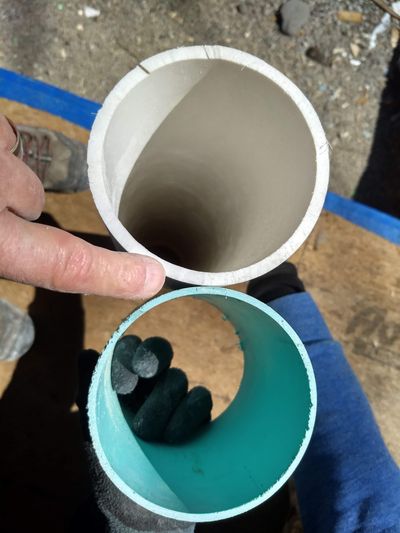
The wall thickness of the pipes is different, as well as the inner structure of the PVC. Many years ago, all I would use would be schedule 40 PVC pipe for house plumbing. You can now buy a schedule 40 PVC pipe that has the same dimensions as traditional PVC but is lighter weight. It’s called cellular PVC. It passes most codes and may work for you in your new room addition bathroom. Be sure to clear this first with your local plumbing inspector.
Give SDR-35 PVC a good look for the outside drain lines you want to install. It’s a strong pipe, and the sidewalls are thinner than the schedule 40 pipe. I’ve used the SDR-35 pipe for decades with fantastic success. The last house I built for my family had more than 120 feet of 6-inch SDR-35 pipe that connected my house to the city sewer.
Lighter-weight plastic pipe with holes in it will work fine for that buried linear French drain. Be sure the two rows of holes aim down. Don’t make the mistake and point them up to the sky as they may get plugged with small stones as you cover the pipe with washed gravel.
Q. I had a plumber install new ball valves in my boiler room months ago. I went into the room the other day to check on something, and a puddle was on the floor. I was stunned. Fortunately, there was no damage. I could see drops of water forming at the handle of the ball valve just above the puddle. I have no idea how it could be leaking there. Instead of waiting for the plumber, is this something I can fix myself? I’m terrified of creating a larger leak, so tell me the truth. Is it better to just call the plumber? – Brad G., Edison, New Jersey
A. I’ve been a master plumber since age 29 and love the craft. It was always a pleasure to share my knowledge with curious homeowners, and I especially love being able to help readers save the money of a simple service call.
Ball valves, as well as other valves, have moving parts. They need to have a seal along the moving parts so the water inside the valve doesn’t make it outside into your home. Over the years, all sorts of materials have been packed into this very tight space to keep water from leaking. This is why the materials, as a whole, have been called packing.
All you have to do is remove the hex nut that secures the ball valve handle to the valve shaft. When you do, you will likely discover another smaller nut right at the valve body.
This is the packing nut. Use an adjustable wrench and get a nice, tight grip on the two faces of the nut. Turn it clockwise a very small amount while facing it. You might only have to turn it 1/16 of a turn or less to get the dripping to stop. Do not overtighten packing nuts.
To prevent a catastrophic flood should something go wrong while making the repair, be sure to locate your main water line shutoff valve. Understand how it works and have a wrench handy should you have to turn it off in a jiffy.
Subscribe to Carter’s free newsletter and listen to his new podcasts. Go to: www.AsktheBuilder.com.