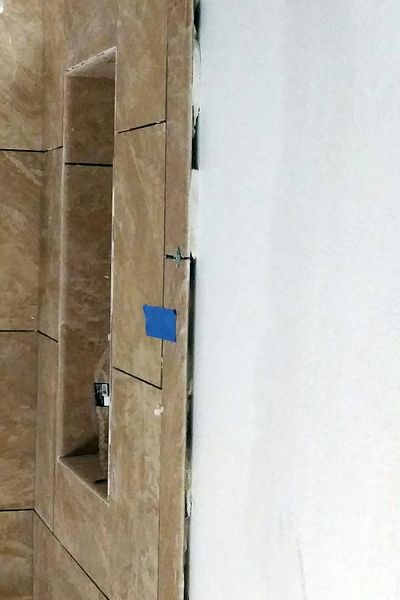
Ask the Builder: Dealing with a bungled wall tile job

DEAR TIM: I’m having a small bathroom remodeled. My wife and I thought we did our due diligence and hired a great contractor. I came home from work to discover the ceramic wall tile has a gap issue. The back of the decorative edge tile is floating above the adjacent wall by almost a half-inch. The remodeling contractor tells me the tile setter is going to fill the gap to make it go away. Is this normal? I’ve never seen the tile sit higher than the adjacent walls. What could we have done to prevent the issue, and should the tile be torn out and redone? – Chris C., Washington, D.C.
DEAR CHRIS: The photo you sent made me cringe. That’s got to be the worst tile mistake I’ve ever seen. Shame on the contractor for trying to cover up for his tile setter’s poor workmanship.
Before I talk about what you could have done, let’s talk about what the tile setter should have done and your options at this point. When I see mistakes like this, I often wonder how many homeowners back down and allow the work to remain in place.
You did a magnificent job over the years looking at other ceramic tile installations and filing away in your head what looked good to you, or at the very least what was the baseline norm.
As you said, you’ve never seen tile sit so high off a wall. That’s because professional tile setters know to make sure that the base they put their tile on is flush with the adjacent finished wall surface.
I know this sounds crazy, but the tile setter may not have made the mistake. It’s very unlikely, but perhaps the wrong thickness of finished wall material was installed after the tile backer board was already up. I’d say the odds of this are very small, but it’s a possibility.
In any event, the buck stops with the remodeling contractor. It’s his job to make sure all aspects of the job are progressing and all the correct materials are on the job so the final product is perfect, or nearly so.
Most builders and remodelers use half-inch drywall on the walls in bathrooms. The manufacturers of the tile backer boards, whether it’s cement board or waterproof gypsum-core backer board, make their products the same thickness so the back side of the tile sits just about 1/16 inch or 1/8 inch above the surface of the drywall after the tile is installed.
This small gap is created by the compressed thickness of the organic mastic or the cement thinset used to attach the tile to the backer board. The gap is easily filled with the tile wall grout and it looks great once complete.
It’s also important for the rough carpenter to get the wall framing perfect so all this works out. The wall studs can’t have horrible crowns or be out of plumb. A crown is a hump in a wall stud that creates a bulge in the wall. If the crown points the other way, it creates a depression in the wall. Both are bad when you’re installing large pieces of ceramic tile.
Great remodelers and builders consider using galvanized steel studs in locations where there will be tile. The steel studs are perfectly straight. If installed plumb and square, the finished tile work looks amazing.
The other advantage to using steel studs in these areas is they don’t warp or shrink. Modern lumber has been hybridized by the lumber companies so it grows faster in the forest. The downside to this is that the light-colored spring wood bands are huge and the lumber is much less stable than lumber from even 40 years ago.
Here are a few options you have at this point. You can remove the tile and start over, but this is going to be very painful. I’m not at your home and don’t know if this is possible, but the contractor may be able to install an additional layer of drywall on the existing drywall to correct the error.
Drywall comes in different thicknesses, including 1/4 inch, 3/8 inch, 1/2 inch and 5/8 inch. One of these sizes may work perfectly and the drywall might slide under the overhanging edge of the tile.
While this is lots of work, here’s how you might have prevented the error. You could have downloaded from the Internet lots of detailed photos of exactly how you expected everything to look once the job was complete. Or, you may have taken lots of great photos from model homes you may have visited over the years. I’m talking about close-up photos of great details of tile work, door trim miter joints, baseboard details where it meets flooring, kitchen backsplashes and so forth.
These photos should have been part of the bid package plans and specifications so each contractor would know the level of quality they needed to achieve. The photos should also have been part of your written contract so you could use them to withhold payments until the work met your expectations.
Few people take the time to do this, but it pays huge dividends to those homeowners that refuse merely to hope everything works out.
Need an answer? All of Tim’s past columns are archived for free at www.AsktheBuilder.com. You can also watch hundreds of videos, download Quick Start Guides and more, all for free.