Concrete work split between prep and pour
Watching a craftsman at work can be an inspiring experience.
We were recently involved in a large, somewhat complex concrete pour. The nine concrete finishers, the two laborers, the carpenter and the pump operator all working together was a demonstration of real teamwork. This crew poured and finished 4,000 square feet of 6-inch-thick concrete (including 300 feet of faced, 6-inch curb) in less than six hours — an impressive feat.
If you’ve been thinking about a summer concrete project, there are a few things to know first. Follow these rules and your concrete project will be a success.
Unlike painting, where preparation is 80 percent of the job, with concrete work the ratio is about half-and-half; 50 percent preparation and 50 percent pour and finish.
Preparing for concrete involves several simple steps:
• Grading. Keep costs down by placing no more concrete than needed.
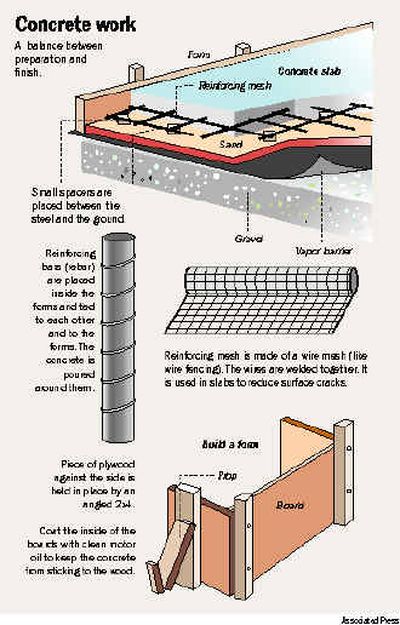
• Forming. Wood forms should be effectively braced as concrete can be extraordinarily heavy. 2x wood form material should be staked at 2-foot centers. Angled braces known as kickers also should be placed at similar centers.
• Structural steel and imbeds. Rebar is better than welded wire fabric for outside work. Remember: concrete expands and contracts radically as the temperature outside changes. Cracks will never be a problem if a mat of half-inch reinforcing steel is used. The bars should run in two directions — crossing each other at a 90-degree angle — and be as close together as 12 inches. Every contact point (where the bars cross) should be attached with steel tie wire.
The grade beneath the concrete should be consistent with the finished surface. This reduces waste, which, in turn, saves money. In extreme cases, it also can reduce the chance of cracking. Thickened areas of concrete next to thin ones can be a future crack hazard. Yes, concrete can be used to eliminate irregularities in the grade, but the best preparation occurs when the final grade beneath the pour is as smooth and even as is possible.
Grading tip: Don’t fill pockets in the grade with loose dirt. Loose dirt does not provide a sturdy base. Instead, use gravel, sand or crushed rock that can be compacted. Check with a local soils engineer to determine which leveling material is best for your project. The more the final grade matches the finished surface of the concrete, the more uniform the concrete will be. The result generally will be a stronger slab for less money.
After the grade is roughed in the forms, it can be installed. Use ample upright stakes (2-foot centers) with lots of angle-brace staking as well. This is one part of the project you can’t overdo. The more stakes, the better. At all costs, you want to avoid having a form “blow out” in the middle of the pour. Next, be sure to use plenty of form release oil. Use a garden pump spray rig to apply the liquid onto every surface of the form material that will come into direct contact with the concrete. This ensures easy form removal later. Be careful here. Form release oil is just that — oil. You don’t want it anywhere but on the forms — certainly not on your clothes, plants, house or existing driveway or decks. Most of all, you don’t want it on the structural steel in your concrete. The strength of structural steel is somewhat diminished when oiled.
With the forms in place, braced and oiled, the next step is to install the structural steel and imbeds. A steel reinforcing bar (“rebar”) mat made of half-inch bars at 2-foot centers is common. Check with your building department to determine the best spacing for your project. When complete, it looks a bit like a tic-tac-toe board. The mat should be dead center between the top and bottom of the concrete. Small concrete spacers known as dobies are placed between the steel and the ground to ensure that the weight of the concrete doesn’t force the steel downward during the pour. This is a important issue since steel loses its ability to hold the concrete together as it nears either surface.
Expansion joint material is nothing more than a half-inch-thick fiber spacer that is placed between existing and new concrete. The joint material gives both new and existing concrete room to expand without leaving a gap between the two surfaces. At this point other imbeds can be installed, such as anchor bolts, hurricane and earthquake ties and post bases.
Pouring and finishing involves:
• Using strong concrete and pouring the proper thickness.
• A pump that costs $300 or more. It can save money in the long run.
• Experienced concrete finishers.
Concrete is measured by its resistance to breaking when compressed. This is called its compressive strength and it is measured in pounds per square inch (psi). Twenty-five hundred psi concrete is most common. Always order concrete by its psi strength. Although 2,500 psi is OK, we prefer 3,000 psi. The latter has more cement in it and is easier to finish smoothly.
Use a pump if you have much concrete to pour. Pumping makes the pour more convenient for the finishers and nothing can destroy forms and steel quicker than wheelbarrows. And, don’t forget waiting time. When you purchase concrete from a concrete plant, you usually get no more than 10 minutes of free pour time. After that, you pay for extra waiting time. That can be expensive. Use of a pump can minimize waiting time and maximize savings.
Most important, hire expert finishers who know what they are doing. Everyone in the industry knows who the good ones are. Check with concrete batch plant personnel, concrete supply stores, etc. Hire at least one finisher per every 500 square feet.