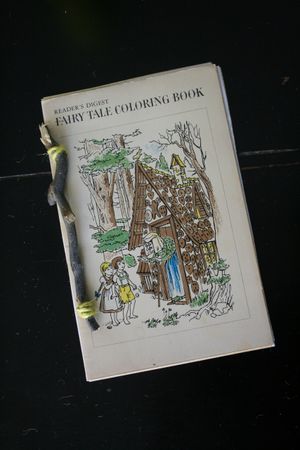
Tutorial: make a stick-bound book
Just a friendly reminder that this Wednesday from 4 to 8 p.m. I'll be running a make-and-take craft booth at the North Idaho Fair.
We'll be using secondhand materials to make fabric triangle pennants, fabric hair flowers and blank books bound with twine and twigs. Stop by and get crafty with me.
In case you can't make it to the fair, I'll be posting the pennant and flower tutorials here later this week ... and the book tutorial now!
As I wrote on my other blog, I figure this little booklet could be used for grocery-shopping or to-do lists. If I were really great at entertaining house guests, I would print out the recipes of the food I made for them while they were staying with me, bind the recipes together this way and then give the book to my friends as a departure gift. As it is, my last house guests were lucky to get clean sheets and take-out pizza.
For step-by-step photo instructions, go here.
1. Choose a front and back cover for your booklet. The paper should be cardstock-like, so consider using cereal boxes, softback book covers, old calendar pages, etc. In the booklet pictured above, I used the front and back cover of a small coloring book published in 1967.
2. Choose some filler paper. I like to mix blank pages with pages from old books, dictionaries or graphing paper.
3. Find a twig, pencil, chopstick or other short stick and a piece of strong string or twine that's about 15 inches long. (The length of your string will depend on how tall the book is that you're making.)
4. You will also need a hole puncher, scissors and either a clothespin or paper clip.
5. Arrange the papers in your hand like a book, sandwiching the lightweight paper inside the heavier cardstock. Tap the stack on the table so that the edges of the left side are even and hold everything together with your paper clip or clothespin.
6. If the papers aren't already all the same size and shape, trim around everything so all the pages (including the front and back cover) are the same size.
7. Punch two holes on the left side of the stack, a few inches apart.
8. Lay the stick on the right side of the holes.
9. Poke one end of the string through the top hole of the book, pulling it through so that about half the length of the string is sticking out the front of the book. Wrap the string around the stick once or twice, then poke the string back through the hole toward the back of the book. Pull so the loop around the stick is snug.
10. Repeat that step with the bottom hole.
11. Pull tightly and tie the ends of the string together in a double knot on the back side of the book.
12. Trim the ends of the string. Or don't. Whatever.
You're done!

